Getting the Big Picture, Tips for Shooting Panoramas
What are panoramas and why would you choose to create one?
A panorama consists of multiple, overlapping images stitched together to create a single image. The long, rectangular variety are the most common and are visually interesting because we naturally take in a scene by scanning, instead of the camera’s traditional fixed view of things. Although they have been around for a long time, advances in panoramic tripod heads and software have made creating excellent panoramas much easier. Even smart phones have panorama capabilities.
How do you know when you have a panoramic opportunity? If you are looking at a scene, scanning back and forth and up and down for that perfect shot, and everything seems good (we call it “everything-looks-good-itus”), it may be a candidate for a panorama image. You know the shot is there, you just can’t narrow it down.
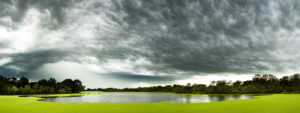
Blackhawk Lake, Iowa, Nikon D810, Nikkor 50mm f/1.4, 1/40 @ f/16, 10 photos
Because we use vertical photos to create a horizontal panorama, a 50mm lens was wide enough to capture the bright algae foreground, as well as the freaky storm clouds, without any distortion. It took 10 shots to achieve the width I wanted in my composition.
But it’s not just about wider or taller. It’s about any shape that includes the elements you want to include in your composition, no matter what the resulting shape may turn out to be. Haven’t you always been a little jealous of painters who can paint on any shape canvas they like? There is no right answer to how many or few shots, or how many rows should make up your panorama image. I’ve shot anywhere from 2 to 48 separate images for a single panoramic image. It is up to you to decide how wide and how tall an area you want to document. Size and shape can help you make a very distinct statement.
This image turned out to be almost our good old 35mm shape (3:2), but that was just a coincidence.

Seavers Road, Palouse, Nikon D750, Nikkor 50mm f/1.4, 1/200 @ f/11, 20 photos in 2 rows
I was leading a photo workshop in the Palouse Hills of Washington when I spotted this terrific huge cloud. It took 20 separate photos taken in two rows to capture this scene with a 35mm prime lens. Many of my students got wonderful images with wide angle lenses but none could capture this entire scene without using pano techniques.
Choosing your equipment
The truth about photography is that, although most things can be done with any equipment, we can usually do a much better job with the right equipment. I can take a pretty good photo with my cell phone’s built in camera, but my Nikon DSLR is always my first choice of camera.
For panoramas, any camera can be used, as long as it has manual white balance and manual exposure capabilities. Every shot in your panoramas has to be consistently exposed—the same shutter speed, aperture and white balance. Don’t use auto settings, polarizing filters, or anything else that might change the individual shots.
Although zoom lenses will give you fine results, the ideal set-up is a prime lens with a DSLR or one of the new mirrorless cameras. Prime lenses are better for panoramas because the entrance point of the lens doesn’t move like it does in zooms. The entry point is the point around which the camera must rotate to seamlessly merge your photos together. If you don’t rotate along this point, your images may not stitch together well, could be ragged, and will definitely need to be cropped down to clean up uneven edges, which results in some loss of content. Simply put, the prime lens will make a panorama that stitches together better (techno-jargon: it eliminates parallax) and loses less around the image’s edges. Most prime lenses are also sharper than zooms. I use a Nikkor 35mm f/1.4, 50mm f/1.4, 85mm f/1.8 and a Zeiss 135mm f/2.0 for almost all of my panos. It is important to choose a lens that has minimal distortion and good edge sharpness.
While a ball head will certainly work, you will get the best results by using a dedicated panorama head, one that is designed to allow you to adjust your camera’s position to rotate around the entrance point of the lens. For an additional cost (isn’t that always true?), you can add a piece that will allow you to tilt your camera up and down. Without it, you will not be able to easily shoot separate rows for a multi-row pano. You can shoot multi-row panos with any tripod head, even hand held, but the results are not as exact and can be a bit harder to stitch together. Using the equipment I have, I believe that I can get precisely what I previsualize in my composition.
Consider the following two panoramas. The first was shot in one row with a 135mm lens and 11 shots.
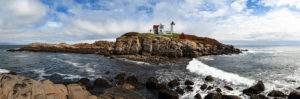
Nubble Light, Maine, Nikon D700, Zeiss 135mm f/2.0, 1/320 @ f/11, 11 photos
Notice the shape and the placement of the horizon line. Note, too, the position of the wave. As in all photography, previsualization, planning, and timing matter. After observing the scene for a while, I got a sense of when each wave would be hitting that specific spot, connecting the foreground to the island. I timed my exposures so that I’d be taking the photo of that spot exactly when the wave was there. With 11 shots, that’s a tricky thing to do!
The next image of the same lighthouse was shot with an 50mm lens. Because I had that extra piece of equipment I could literally point down and refocus for the lower row of photos. (Yeah – you can do that but stop down your f/stop to play it safe.) See how it looks like I had a huge amount of depth of field? The resulting angles almost looks like I used a view camera or shift lens to take the photo.
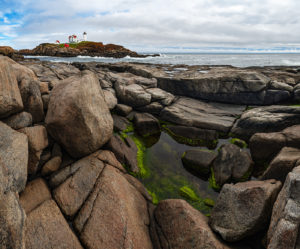
Nubble Light, Maine, Nikon D700, Nikkor 50mm f/1.4, 1/250 @ f/16, 18 photos, 2 rows
While you can use a ball head or even hand hold your camera, I much prefer using a panorama head. I use one made by Really Right Stuff but there are many brands and models available. Dedicated panorama heads typically attach to your existing tripod and provide smooth, level rotation for your camera.
Your panorama head should come with instructions on how to set it up for your lens’ entrance nodal point. You can also check out online tutorials to learn how to configure your panorama head to rotate around the entrance nodal point of your lens.
Keep in mind you’ll need to determine this for each lens that you use, but you only have to do it once.
Camera settings
Since you are combing multiple pictures together and want all the exposures to match exactly, you should be using manual settings. These include white balance, aperture, shutter speed, ISO, and focus. Stay away from any automatic settings, as the light often changes from one exposure to the next and auto settings will adjust. That could ruin your panorama, so don’t take the chance.
Correctly exposing a panorama can be tricky because you may be dealing with a wide range of light across the scene. I recommend trying to meter for an “average” shot in your panorama. To do this, set your camera on aperture priority and rotate your camera through the panorama to find a section of your image that is approximately mid-way between the lightest and darkest parts of your total image. Check the exposure your camera indicates, then switch to manual, and set your camera to those settings.
Do the same thing if you tend to prioritize avoiding overexposures by exposing to the right and “shooting for the blinkies.” If that’s the case, find the brightest tone on which to base your exposure. Then manually set your camera and continue.
Even though you’re shooting RAW, you should still set a manual white balance for the most uniformity across your pano. Since you will most likely be outside, this will usually be either “Sunny” or “Cloudy”. Remember, you can always tweak the color later in Photoshop. For now, you just want to be as consistent as possible. Don’t use auto white balance, as it will change from shot to shot and it could ruin your panorama.
Shooting your images
You should shoot in RAW for best results. Some cameras can be set for more than one type of capture. If you can shoot both RAW and JPG, then you can quickly stitch the JPG versions to decide which panos work out best.
Make sure the tripod is completely level. Most pano heads come with a bubble. If you don’t have one near the head that you can see, you have a few options. You can buy a bubble level that slides into the hot shoe on the camera, or just go to your local hardware store, and buy a small level that you can lay across the top of your camera.
Set up your camera in portrait orientation (i.e., vertical). It seems a little counterintuitive, but portrait gives you the best ratio of height vs. width. Remember, you are shooting a whole series of images that will be stitched together, so it will be plenty wide.
When panning and shooting the individual images, try to overlap each image about 25-30%. It seems like a lot, but it makes stitching almost completely automatic and transparent. I avoid the “click stops” of some panoramic heads. They are not calibrated for any particular lens focal length and may not give you the ideal amount of overlap.
Try to shoot fairly quickly to avoid changing light. I always shoot my finger first and my fist last when I shoot panos. Adding these two shots ensures that I will remember where my panos begin and end when I’m processing. Imagine editing your images and suddenly realizing that you have deleted half the shots in your pano because you forgot about the panorama and, individually, the images looked, well, crappy. Yeah – been there, done that. Shoot your hand! If I’m shooting the same panorama more than once, I will also hold up as many fingers as I’ve shot versions of the same compositional idea. That way, most of the time, I only have to process the last one.
Pay close attention to shots with wind or movement that would blur when combining the multiple shots, for instance having leaves or flowers in the foreground that are swaying in the breeze. If you are shooting waves, you can try shooting at a slower shutter speed and blurring the waves, or just try to time your individual shots to capture the scene seamlessly. It may take you several attempts to get it right. Good thing we’re not paying for film!
Use a remote release and if available the mirror-up setting or delayed shutter release for maximum sharpness.
Finally, there are things you can do “in camera” with panos simply because of the multiple shots. There was too much space here between the truck and the hay bales to make a pleasing composition. The tractor was great but still didn’t fill the space enough for my taste. The light was consistent so I simply waited to get the tractor where I wanted twice in the same panorama.
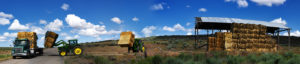
Harding Road, Washington, Nikon D810, Nikkor 85mm f/1.8, 1/200 @ f/10, 12 photos
Stitching together your individual images into a panorama
Surprisingly, stitching your images together is the easiest step of all. There are many dedicated programs (including Lightroom Classic) and plug-ins that do the job – I prefer the built-in capabilities of Adobe Photoshop.
For Photoshop workflow, first load your RAW images into Adobe Bridge. Next, select all of your panorama images and open them together in Camera Raw. Choose “select all” and process them together. It is critical that all of your images be processed as one. Just click “Done” after you are finished and return to Bridge. Next, from within Bridge select all of the images again (they should still be selected) and choose the action Tools -> Photoshop –> Photomerge. I almost always use the “Cylindrical” mode, but try others and see what you get. After a while (and it could be a long while if you have a slow computer or a lot of images) your panorama will come to life in Photoshop.

Make sure to crop the outside edges, as even the best panorama will have a little bit of edges that are missing. These days with “Content Aware Fill” you can sometimes save a lost edge. After inspecting my image to make sure it has stitched together without any seams, I flatten (Layer -> Flatten Image) my image to make the file size smaller. Then just process the same way you would any other photo.
I keep my RAWs in a folder along with my full-sized images. I can’t tell you how many times I have reworked the RAW files to recreate panoramas over the years. They keep improving Camera Raw and Photoshop and your abilities as a processor keep improving so it’s always worth seeing how you can improve on your original idea.
That’s it – now you have the Big Picture!
*The entrance point of a lens is the point inside the lens at which the light paths cross before being focused on the sensor or film plane.